Share This Post:
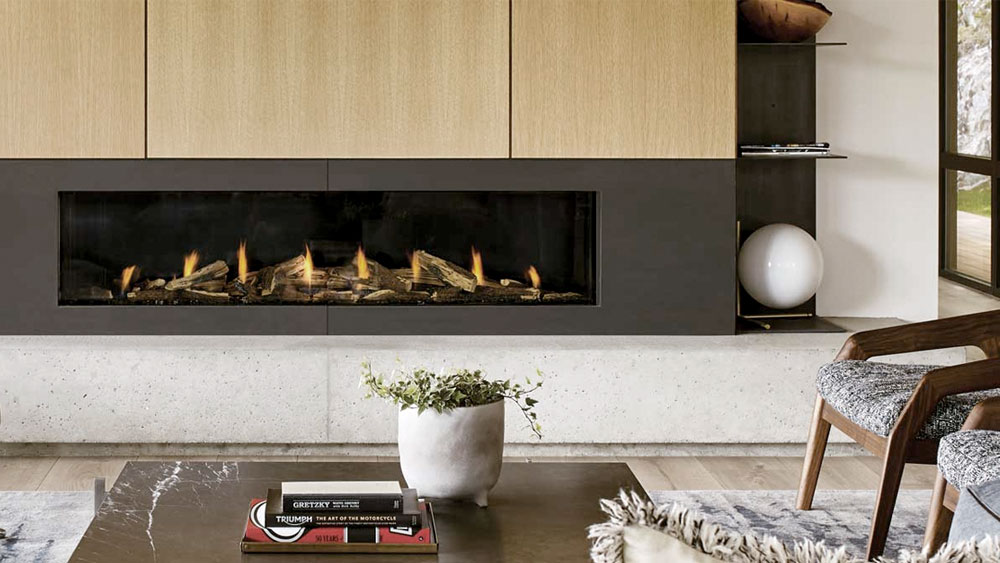
Image Credit: Regency Fireplace Products
Fire Up Your Smart Switch
Fire Up Your Smart Switch
TECHNOLOGY | Joshua Aaron | March 26, 2021
TECHNOLOGY | Joshua Aaron
March 26, 2021
How cool would it be if you could replace your normal gas fireplace on/off switch with a smart switch? Well, buckle up, because that's exactly what I am about to explain.
First off, let's start with the legal disclaimer. I am not a certified electrician and playing with electricity is very dangerous. Do not attempt to do anything I suggest without first consulting a certified electrician, and always maintain the highest levels of safety. Additionally, there are a lot of people who say that making a fireplace a smart appliance is a bad idea due to the possibility of the fire turning on when it shouldn't and potentially burning your house down. Yes, it could absolutely happen if you are not paying attention and accidentally setup a smart lighting scene that randomly turns lights on an off when you are out of town, and just happens to include your now smart fireplace. Ensure you have taken all necessary precautions before even thinking about attempting anything in this article.
And finally, this article serves to educate, not instruct. This is for entertainment purposes only and should you attempt anything in this article, you agree that you will not hold JCA Design Group, nor any of its employees, accountable for anything that may go wrong. So, yeah, don't listen to anything I say. I have no idea what I'm talking about, and you should never attempt anything discussed in this article. Clear? Good.
OK, now that all of that is out of the way, are you ready?
If you have any smart switches in your home, you are probably already aware of the fact that they need 110v power in order to operate. Likewise, if you are familiar with your gas fireplace switch and some of the electronics that allow you to turn on and off the fire as you would a light in a room, you probably know it operates on low voltage power (12V or 24V).
Low voltage wiring cannot hurt you like high voltage wiring can. That is why it is not on a breaker and you do not need to be cautious when touching it.
On the other hand, high voltage wiring (110v) is extremely dangerous and can kill you. Let me repeat that. It is very dangerous and if handled incorrectly it can KILL you. Always ensure the breaker to the switch and/or outlet you are working on is OFF before unscrewing anything, touching any of the wiring, etc. Safety first. I cannot stress this enough so I'll say it again. Safety first!
So if your gas fireplace switch is low voltage and your smart switch is high voltage, how can they possibly work together without blowing out your fireplace components? Well, this is where the magic happens, all by way of a very inexpensive little part called a relay.
What is a relay?
An electrical relay consists of an electromagnet and spring loaded changeover contacts. When the electromagnet is switched ON/OFF with a DC supply, the spring loaded mechanism is correspondingly pulled and released by this electromagnet, enabling a changeover across the end terminals of these contacts. An external electrical load connected across these contacts are subsequently switched ON/OFF in response to relay electromagnet switching.
Did you get all of that? No? Don't worry. I'm sure quite a few of our readers got a little bit lost. Let's try again.
An electrical relay gives you the ability to switch between normally open (N/O - which means off) and normally closed (N/C - which means on) when there is voltage applied to the relay. Let's use an old school, slots in top toaster as an example. Plugging the toaster into a wall outlet connects power to the toaster itself, but it remains off. This is because the relay inside is in a normally open (N/O) state. You're ready for your morning toast, so you put in the bread and press down the lever. Here is where you have engaged your relay, and thus it switches to the normally closed (N/C) position and the toaster begins to heat up. Inside your toaster, there is a relay that activates when you press down the lever. This is the magic of a relay and the switching between normally open (N/O) and normally closed (N/C). When you push the button to start your morning toast, the relay receives power and switches to the normally close (N/C) state. This is the same as flipping a light switch from on to off. You are simply completing the circuit.
OK, now you should have a basic understanding of what a relay does and how it works. So how do we use it in this scenario? It is actually pretty simple.
On a relay there are terminals to which you connect wires. You will connect a line (AC voltage) and a neutral/common wire to power the relay. You then connect the two wires that are most likely currently connected to your on/off switch to the relay, in order to allow the relay to control whether your fireplace is on or off. This is where the switching from normally open (N/O) to normally closed (N/C) comes into play.
Your relay will be labeled with numbers, and to make things easier, I highly recommend purchasing a relay that also has a socket base. So that you understand the different components, the relay is the clear plastic piece that will plug into the socket base. The socket base is usually a black plastic structure with screw terminals. That means that you will plug the relay into the socket base and connect the various wires to the socket base's screw terminals in order to make the appropriate connections. This alleviates the hassle of soldering the wires directly to the relay.
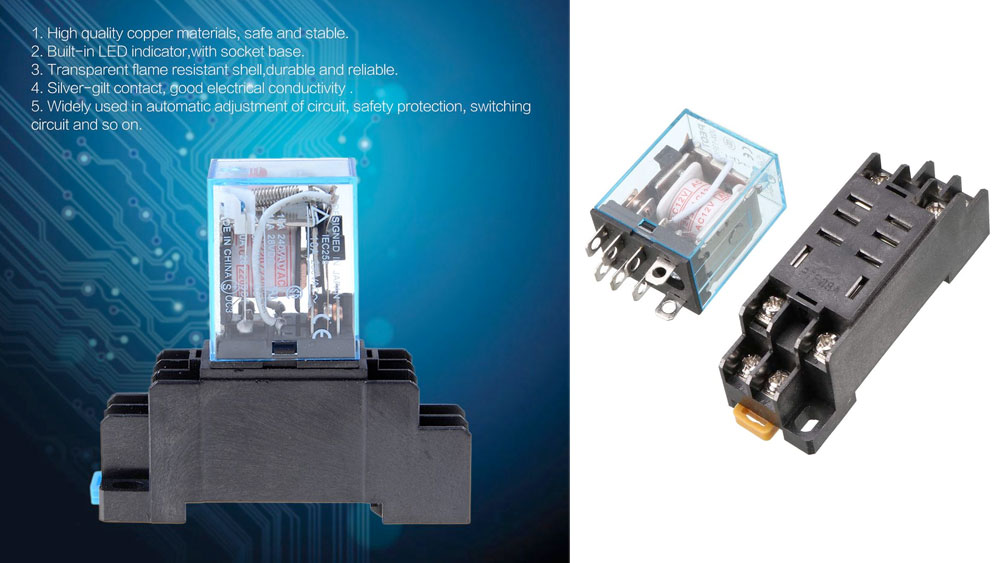
Image Credit: Uxcell
I chose to use an Uxcell AC 110V Coil Power Relay 10A DPDT LY2NJ with a PTF08A Socket Base. As of the time of this post, you can find it on Amazon for a whopping $9.99. No, we are not Amazon affiliates and no, we don't make any money from you buying this part. That is why there is no direct link. Just copy, paste, and search. You'll find it.
Additionally you are going to need some 12/2 electrical wire, and for the easy implementation I will describe below, the cheapest non-grounded extension cord you can find. For testing purposes we picked one up for $1.97. It also really helps if you buy some push-in wire connectors like the ones from In-Sure. They're so much easier than using wire nuts and ensures a solid connection. You can purchase two-wire and three-wire push-in connectors depending on how many you need to connect for different portions of this procedure. All of this is very inexpensive and will make the job a breeze.
The other tool I have in my arsenal is a multimeter. You do not need one for this application, but if you have one around, it is great for testing continuity. Explaining the ins and outs of using a multimeter is outside the scope of this article but there are plenty of YouTube tutorials out there if you are not already familiar. As an aside, my grandfather was an engineer, and when he passed away years ago, I was fortunate enough to have my pick of the litter of his tools, one of which was his multimeter. No matter what project we attempt these days, his tools always seem to make there way into the equation, so thanks Grandpa.
Alright, now you have the gear and the basic knowledge, so let's get this road on the show. Scratch that, reverse it.
I am going to explain two ways of wiring this up. The easy way and the slightly more difficult way. Depending on what is available to you, you can make the decision on which one fits your needs. I highly recommend reading this entire article instead of skimming or skipping portions. Remember, this is electrical and you want to stay safe, as well as protect all of your equipment and components.
The Easy Way
A lot of gas fireplaces have an outlet inside where you can plug something in. You can usually find this if you open the bottom hatch of your fireplace where all of the controls are located and look to one side. If you have a blower in your fireplace, this is where it receives power. To ensure that the outlet is properly wired up and ready to provide the power you need, simply plug anything into the outlet and see if it turns on. If it does, you can proceed with the easy way. If not, well, you and I find ourselves in the same boat and need to do this the slightly more difficult way.
Remember that cheap extension cord I mentioned above? Well guess what plugs into that outlet? You guessed it, but don't plug it in just yet.
To start off we are going to make a simple on/off switch, just using the extension cord and the relay.
Take a pair of snips and chop off the receptacle portion of the extension cord (leave some length to work with) so that you are left with a plug going to bare wires. If you trace the cabling, you can determine which wire is the line and which is the neutral. The larger metal piece of the plug (the part you stick in a wall socket) is the neutral and the smaller is the line. Make sure to label the wires so you don't get confused.
On the relay there are two terminals for 110VAC to Relay Coil. On the Uxcell I mentioned, these are terminals 7 & 8. Remember that the numbers are reversed on the socket base from the relay because you are turning the relay upside down in order to plug it into the socket base.
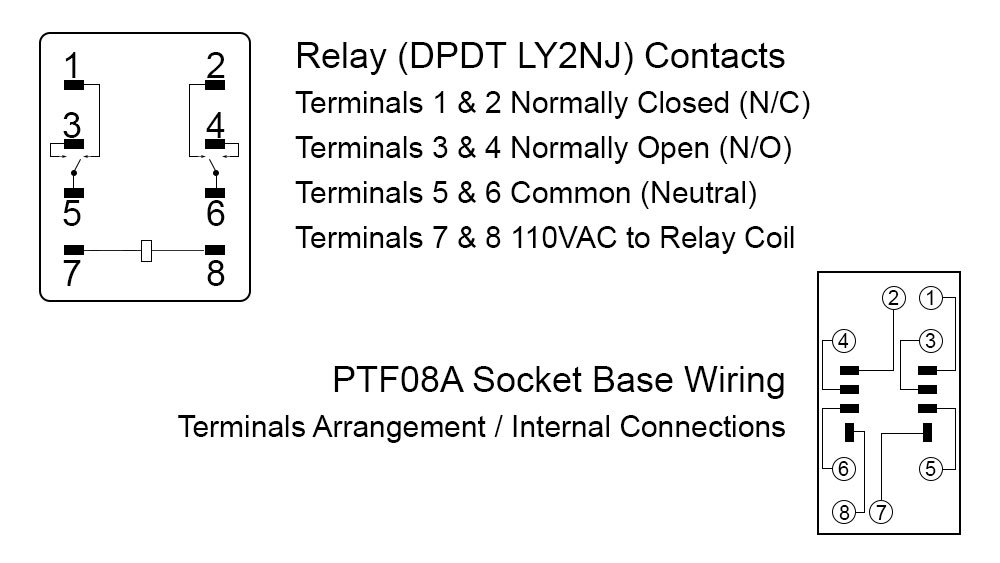
Image Credit: JCA Design Group
Connect the line to one side and the neutral to the other (in my case I connected line to terminal 8 and neutral to terminal 7). Now you have one side of the relay that has power and the other side that will not pass any high voltage to your fireplace.
In order to complete a circuit you need to connect to the neutral/common and the normally open (N/O) of the relay, so that when there is no power to the relay, your fireplace is off. If you were to connect to the neutral/common and the normally closed (N/C), your fireplace would turn on when there is no power to the relay. Not a good plan.
If you connect the fireplace to the side of the relay that has the line connected, you are going to pass 110V current through to your fireplace and odds are you are going to blow up your thermopile and potentially damage other portions of your equipment. This is why it is important to pay attention and use only the neutral/common side of the relay.
Connect the two wires previously connected to your on/off switch to the netural/common side of the relay, and to the terminals for common and normally open (N/O). Again, in my case these were terminals 5 & 3. As an extra precaution I also ensured that I was connecting the wire connected to the TH socket on my fireplace to the common (terminal 5) and the TP/TH to the normally open (N/O - terminal 3). To be honest I am not sure this matters.
And now we are ready to test.
To test, simply plug into the outlet and see if your fireplace turns on. You should hear the relay click and the small light on the top of the relay will turn on. This means power is properly applied to the relay and it has switched from the normally open (N/O) to the normally closed (N/C) position and told your fireplace to activate.
If that worked, unplug the extension cord and let's get your smart switch wired in. If it didn't work, well, go back and re-read.
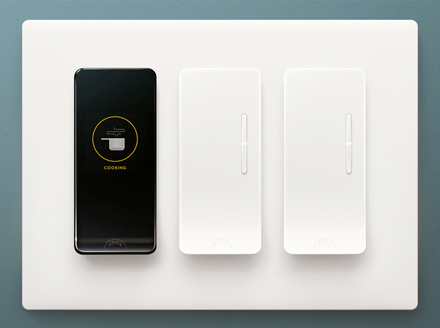
I am personally a huge fan of the Noon Home smart lighting system, however you can use pretty much any smart switch you wish as they all work in basically the same way. Noon just makes a really solid product and they look great. The caveat is that you cannot use any switch designated for dimming a light. You need a simple on/off smart switch. Noon makes both an extension dimmer and an extension on/off for just this purpose. Well, in fairness it is not really for this purpose, but… you catch my drift.
Smart switches need 110V line level voltage, a proper ground, and a neutral/common. You will also notice another wire, usually red, coming out of the back of the smart switch. This is for load level. Line level comes into the switch from the wall (or the power in your home) and load level is what would run to a light to provide it power.
Depending on who wired your home, your colors may be different, but the standard coloring for electrical is as follows:
- Line Level (Black)
- Load Level (Red)
- Neutral/Common (White)
- Ground (Unshielded Bare Metal)
This is where your push-in connectors come into play. If you opted to use wire nuts instead, that is ok too.
- Connect the line level of your extension cord to the line wire of your smart switch
- Connect the neutral/common of your extension cord to both the smart switch's neutral/common AND the relay terminal
- Connect the load level of your smart switch to the other side of the relay's 110VAC to Relay Coil
- Your fireplace connections should still be in place, but just as a reminder, connect them to the neutral/common side of the relay only, and to the common and normally open (N/O) terminals
You can use the wiring schematic below to see how everything connects.
You will most likely need to extend the smart switch's wiring to where your relay is sitting (in the bottom cavity of the fireplace) and this is where that extra 12/2 electrical wire comes in handy. Using the push-in connectors, match up the wiring (black to black, white to white, etc.) and create a wiring extension that feeds down into your fireplace cavity and to the relay. Unfortunately, I cannot provide any further details on this portion because everyone will have a slightly different scenario, but I am sure you will figure it out.
The other potential issue is that if you do not have a ground available, you will need to figure out how to properly ground the ground wire of your smart switch. You may be able to utilize the ground wire that is hopefully present in the electrical box you are plugging the extension cord into. You know, the one that powers your fireplace's blower. Again, this is different for everyone, but it is extremely important to the proper operation of your smart switch. So… you know… heads up.
Now you have placed a relay between the smart switch and the fireplace, while still providing full 110V power to your smart switch. Plug in the extension cord and your smart switch should come alive, but your fireplace should remain off. Press your smart switch and your fireplace should turn on.
Please ensure that there are no line, load or neutral/common wires exposed as safety is the utmost concern. You can purchase sleeves if you wish, but wrapping in electrical tape and using short bare wire connections should be sufficient. It is up to you.
And, you're done. It really was that easy. Program your smart switch, set a scene, and away you go.
The Slightly More Difficult Way
Now onto the more difficult, but in my opinion the proper, way.
To ensure everyone's safety, and to provide the full explanation to our readers, I am going to repeat a bunch of information in case some of you did not listen to me above and skipped through this article.
You do not need the extension cord in this scenario, just the 12/2 wiring and the push-in connectors to make the job a bit easier.
Begin by shutting off the breaker that controls the nearest outlet or light switch as we will be using the wiring of these to complete the task. Either an outlet or a light switch will work. I did not have a light switch close to my fireplace so I used an outlet. The idea here is that we are going to provide full 110V power to the smart switch, just as if we were running wiring to a regular light switch and light.
Using your 12/2 electrical wire and the push-in connectors, splice in and run the new 12/2 wire to the junction box where your smart switch will be installed. Bear in mind that this may require cutting out some drywall, which means you should be prepared to replace it, tape and float, sand it down and paint it. Yes, it's a process.
Now that you have 110V electrical coming to your junction box, we can wire everything up. By the way, that was the hard part. Everything else is now super easy and I have provided a detailed wiring diagram below for your reference.
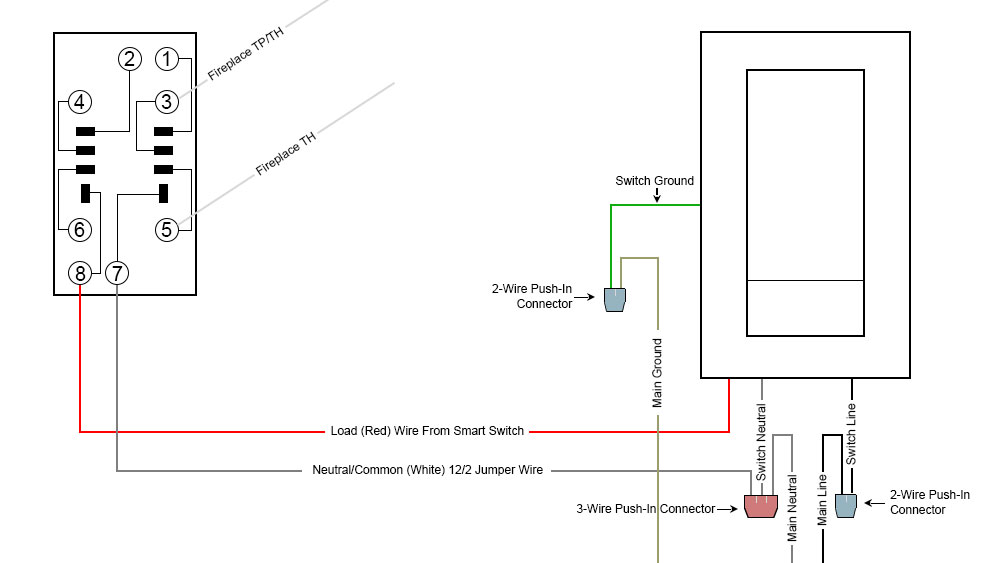
Image Credit: JCA Design Group
- Connect the line level (black) from your 12/2 electrical wire to the line level of your smart switch using a two-wire push-in connector
- Connect the neutral of your 12/2 electrical wire to BOTH the neutral/common of your smart switch AND the relay using a three-wire push-in connector and an extra piece of 12/2 electrical wire (I used terminal 7 on the relay)
- Connect the load level (red) of your smart switch to the other side of the relay (I used terminal 8) - You will most likely need to extend this wire, so just use a piece of the 12/2 electrical wire and the two-wire push-in connectors to make it happen
- Connect the ground wire (green) of your smart switch to the ground wire of the 12/2 electrical wire using a two-wire push-in connector
- Connect your low voltage fireplace wires to the common and normally open (N/O) of the side of the relay where the neutral/common is connected. In my case, these were terminals 5 & 3, respectively.
CAUTION: Make sure that you only connect your fireplace to the common side of the relay or else you will pass 110V power through to your fireplace and potentially cause major damage, including a spectacular blowout of your thermopile.
Turn your breaker back on and your smart switch should have 110V power, but your fireplace should remain off. Press your smart switch and your fireplace should turn on.
That's it. You're done. Program up a scene and watch your fireplace come alive.


